My favourites are pretty much any cotton board, L Juhl artique from Arqadia and then pretty much any Arqadia board.
All these are done on Arqadia whitecore conservation and Nielsen-Bainbridge alphamat artcare. Artcare is my default board but the surface sizing has been really inconsistent over the years, which is bad because their "vellums" were specifically made to take water. Currently they are going through a 'good' phase!
Test for sizing by applying a large brushstroke of clean water and watch it - if it sits there in a puddle for some time, great, the longer the better, if it soaks in quickly - or worse still raises the surface paper and/or goes blotchy - avoid.
Textured board is not traditional but you don't have to care about that if it works for what you need it to work for.
The biggest brush in my photo is sable/ox mix and is from Simons and I've no idea on the others, I think one might be pure sable.
This week I am mostly .....


Re: This week I am mostly .....
Good question.
Facing papers come in lots of forms. For classic washlining shades of off white though to Ivories are the norm. I've done a lot on Ingres mountboard: the paper is made for drawing on so will take watercolour nicely. Quite a few other drawing papers are used on mountboards. The heavily textured boards are maybe best avoided. Smoother surfaces work best. It's a good idea to try a few to see if you can find the magic ones. My favs are Daler Sand Ingres and Aqadia Lemon (8623 I think.....).
Sorry A.G., Hayseed is a bit too lumpy for me as regards lining.
Btw. I always use powders for the panel. Not because it's any quicker or produces a better result. It is a bit less wearing on the nerves than wet wash. And you can leave off halfways though. Idiot Proof in a word (two words). And that's a big plus in this establishment.
Watch Out. There's A Humphrey About
-
Roboframer
Re: This week I am mostly .....
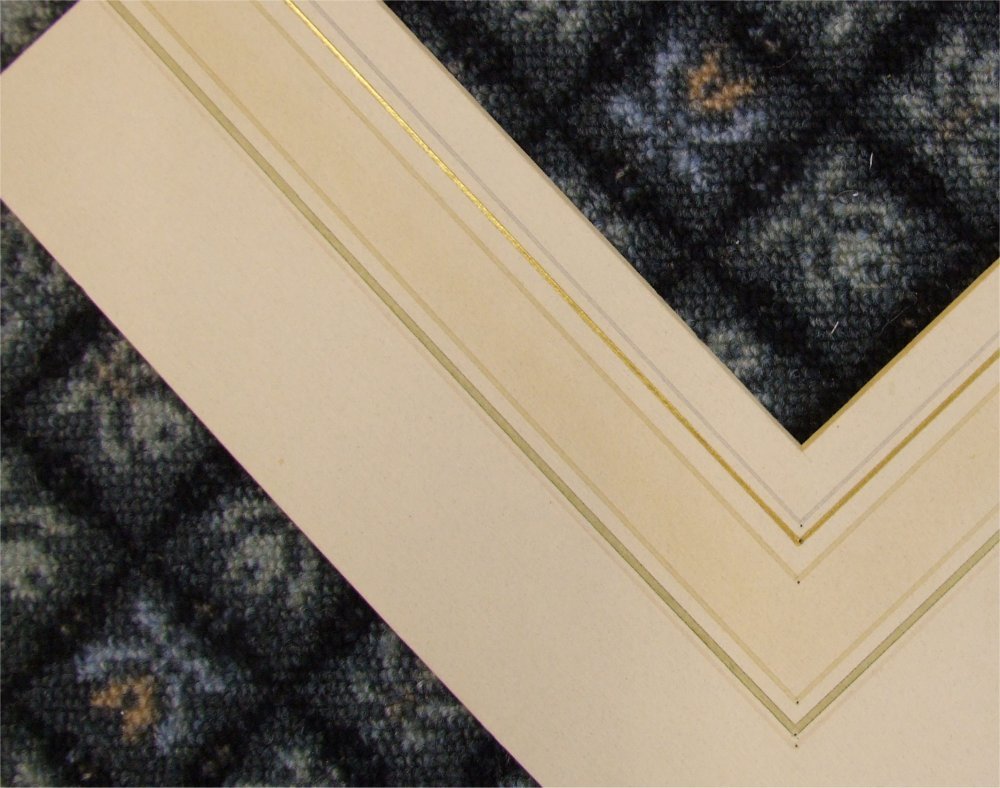
There are many ways of creating lines and panels; powders, self-adhesive papers, self adhesive gold lines, V Grooves, embossing (or debossing, whichever rocks your bert) and even inlays, where you cut the panel out, set about it with brushes, air brushes, sponges, toothbrushes ... etc - let it dry and stick it back in, whatever works for anyone, works.
But the good old wet way can't be matched if done right, especially when you start messing about with real gold ... and it's very satisfying and therapeutic. I think it's good to do at least one thing a day that involves your tongue poking out, not to mention that can be done sitting down, this and lacing needlework is about it. Oh yeah - plotting CMC cuts, but that's normally in seconds.
Wet panels aren't that difficult either, you first lay down a panel of clean water, and if that goes over the lines you just dry it off with kitchen roll up to the lines, when you apply the colour on to that wet panel you don't have to worry so much, you can aim to stay a fair bit inside the lines and then just tip the board.
-
Jamesnkr
Re: This week I am mostly .....
Ah, useful tip. But how - in the absence of a CMC - do I make the lines?Roboframer wrote:Wet panels aren't that difficult either, you first lay down a panel of clean water, and if that goes over the lines you just dry it off with kitchen roll up to the lines
-
Roboframer
Re: This week I am mostly .....
Although I emboss the lines it's not the lines I'm after, it's the corners, which I mark with pencil dots and then draw any lines I need in pencil too.
You need a corner marking gauge https://www.lionpic.co.uk/p/7822/Longridge-Corner-Gauge - you can easily make your own by mitring a strip of board, preferably bevelled, and then marking 3mm increments, numbering them, or every other.
You need a corner marking gauge https://www.lionpic.co.uk/p/7822/Longridge-Corner-Gauge - you can easily make your own by mitring a strip of board, preferably bevelled, and then marking 3mm increments, numbering them, or every other.
Re: This week I am mostly .....
For Marking guages I use moutboard chevrons. Draw a faint line across the corner and work out your design. Then poke though with a sharp pointed thing. I use half of a pair of drawing compasses. This way you build up a nice library of patterns. To use, simply place the chevron on each corner of the mount and align with the window. Poke though carefully with the pointy thing. You only need a tiny hole that you can just see.
You can even rule the lines and tint the panel. I have a stack of chevrons I have been using for ages. Marking gauges are OK, but you have to remember the combinations.
Another thing about powder colours - You rule the lines first. There is a knack to using them and some colours work better than others. You scrub the powder into the board using a foam brush using a thick piece of mountboard as a guide. You don't have to worry too much about lose particles going outside the panel area. Then gently brush away lose bits (back into the pot). The magic bit is to take a rubber crumb drafting pad and rub the panel. This will take off any powder that will come off and leave a very subtle tint.
Wet washes are easy enough on smaller mounts. I have in the past done washlines on mounts with a 36x24 opening. Double mounted with a fillet between the layers. That about 11ft or more of panel to tint an a mount that took not an inconsiderable time to build and two sheets of board. One hiccup and it's knackered. It's bad enough ruling the lines on.
Watch Out. There's A Humphrey About
-
GeoSpectrum

- Posts: 2151
- Joined: Fri 01 Oct, 2010 11:49 am
- Location: Lincolnshire
- Organisation: Ashcraft Framing
- Interests: Family, x-country skiing, wine, art, Jazz
- Location: Gainsborough, Lincolnshire
- Contact:
Re: This week I am mostly .....
Any recommendations for the powder colours. There's Everest of course, any others? And the rubber?
Alan Huntley
Ashcraft Framing
Bespoke Easels and Self-assembly tray frames
http://www.ashcraftframing.co.uk
Ashcraft Framing
Bespoke Easels and Self-assembly tray frames
http://www.ashcraftframing.co.uk
-
Trillian
- Posts: 161
- Joined: Sun 20 Mar, 2011 3:05 pm
- Location: Lincolnshire
- Organisation: Considering the options. Again!
- Interests: Changes on a daily basis, but I'm never without a book to read.
Re: This week I am mostly .....
I took a look at the FB Group that Roboframer mentioned, it looks really helpful, and friendly to boot. I applied to join, but I've been black balled! I should have just kept quiet, as now I can't access the page at all, even though it's a public group. I could understand it if my FB profile was all in Chinese and promoting 'designer' handbags, but it's not 
I really don't know why I bother sometimes...
I really don't know why I bother sometimes...
Re: This week I am mostly .....
As far as I know the Everest colours are the only ones available. I'm still using 'Mat Magic' colours that were discontinued way back. Fortunately, when I got wind of the disco I bought the entire remaining stock from Meridian Mouldings. Never heard of them?GeoSpectrum wrote:Any recommendations for the powder colours. There's Everest of course, any others? And the rubber?
Some folks grind up artist's pastels but you have you get the powder uber-fine and no lumps.
Foam brushes from Lion. I can't remember if they do the drafting pads. If they do I can't find them in the cat. Simons do them. They are a muslin bag full of rubber crumbs. Very useful for other jobs about the workshop.
Watch Out. There's A Humphrey About
Re: This week I am mostly .....
I did this when I was trying to master lines. Haven't done one like it since.  Thing is, full mounts have four corners.
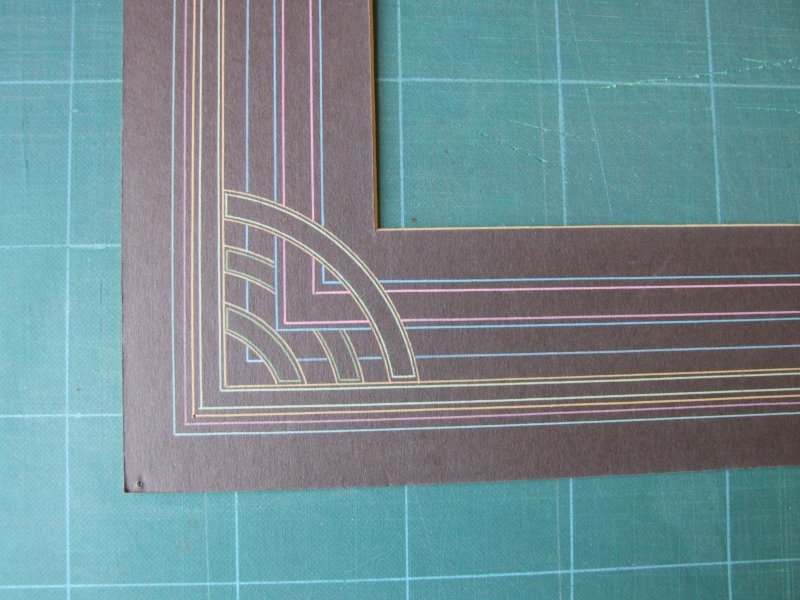
This is one of my samples....

Done with powder coloured panel.
(Excuse the huge holes in the corners. I use it as a marking gauge)
Big Version
This is one of my samples....
Done with powder coloured panel.
(Excuse the huge holes in the corners. I use it as a marking gauge)
Big Version
Watch Out. There's A Humphrey About
-
Trillian
- Posts: 161
- Joined: Sun 20 Mar, 2011 3:05 pm
- Location: Lincolnshire
- Organisation: Considering the options. Again!
- Interests: Changes on a daily basis, but I'm never without a book to read.
Re: This week I am mostly .....
I love your deco inspired sample, Prospero. The colours look fab on the darker background 
-
Jamesnkr
Re: This week I am mostly .....
What about the ruling pen? Any recommendations? I have a (actually, my mother has a, and she's not very conveniently placed) quite nice box of 1930s drawing instruments (compasses, etc) that contains a couple of ruling pens - I'd always wondered what they were... How are these likely to compare in quality with the one Lion sells for £20?
Re: This week I am mostly .....
Try them and see James. 
They do wear out though. Also they tend to wear according to the individual's grip, so best not to share them. Get a new one and get it broken in with lots of practice.
Tips. Don't be too fussy about cleaning the inside of the blades when you have finished. A thin build up of dried paint helps to hold the subsequent loads in suspension I find. Don't dip the pen in the paint/ink. Get a loaded brush and stroke it on the side of the blades. Don't try and get too much in at once. Start with thin lines and work you way wider.
Try and do everything in slo-mo. Sudden moves are best avoided. Think Tai-Chi for framers.
They do wear out though. Also they tend to wear according to the individual's grip, so best not to share them. Get a new one and get it broken in with lots of practice.
Tips.
Try and do everything in slo-mo. Sudden moves are best avoided. Think Tai-Chi for framers.
Watch Out. There's A Humphrey About
-
Roboframer
Re: This week I am mostly .....
If the Lion one is the ecobra in my photo - yes!
It's got a bit of weight to it which helps with keeping the hand steady as does it being flat, rather than some skinny thing that needs to be gripped tighter. Regardless of size though, bigger/wider ones won't take any more liquid than skinny ones, you can't defy gravity/
Wipe the bottom of the nib dry after each "fill" from a brush and always start off on a spare bit of paper/board to avoid a sudden blob if/when you load it too much.
You will need to clean it from time to time, especially if you use adhesive for gold lines and the ecobra nib pivots to make cleaning very easy.
.