I am looking for some tips again as I am starting off from scratch.
I am trying to find a good value (ie cheap as chips if possible!) way of presenting posters of varying sizes and I am now looking at going for floating frames as they look really good and will weigh alot less than a blockmounted poster which was my original idea.
I would hope to be making around a dozen or so a week of these frames so I guess (and hope!) I wouldn't need lots of expensive equipment.
I was looking at getting the frames from lionpic and mounting the posters on MDF using a vacuum press (ok I know thats the expensive equipment idea out of the window!) and then gluing that onto the frame with PVA. Hope I'm doing ok so far?
The first thing I should ask is will this work ok for very large posters up to 39 x 55 inches in size? (Most of the posters I will be doing though will be 24 x 36)
What equipment should I use for creating the floating frames?
I assume I'd need a mitre saw to cut the required lengths ready for fitting together? Maybe theres something better to use? Some of those mitre guillotines and underpinners I've seen are really expensive and I assume I wouldn't need one of those puppies.
Next what do I use to stick the 4 bits of frame together?
I've seen vices and clamps and all sorts in the lionpic catalogue but I dont know what would be a good way to start.
Should I be looking at something like the Logan Studio Joiner?
Does that fix the frame together and then job done?
If anyone has any other ideas I'd really appreciate it.
thanks alot
Making floating frames - advice for newbie
-
blockmount boy
- Posts: 12
- Joined: Tue 06 May, 2008 8:20 pm
- Location: Stockport


How about this....
You can buy square section moulding with a rebate in various widths. Ash would be nice as it takes the knocks. If you mitred it on it's back, that is with the rebate facing up, it would form a neat little shelf to drop the board in. The typical rebate depth is about 7-8mm so if you could get 6mm MDF that would work nicely.
A Morso guillotine would be the favourite cutting gear, but you might be able to manage with a small electric mitre saw. The pro ones with all the bells and whistles are on a par costwise with Morsos, but there are DIY versions that are <£100. One of these may do the job, but as with anything else, you get what you pay for.
Joining hard woods with an underpinner is not easy, so you may as well nail the corners. A Stanley mitre vice would be good. Or a strap clamp is maybe better, if there is enough room to drill/nail the corners while it is on. Fill the nail holes and paint the whole thing black. Paint the back of the board as well, for neatness and to seal the board from humidity.
You shuld be able to do a dozen frames a week using these methods.
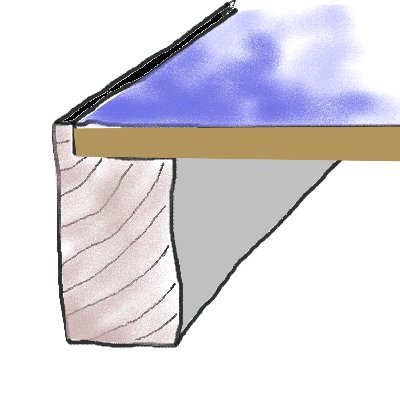
Sorry for crap drawing.
*A local timber merchant may be able to machine just the profile you need.
You can buy square section moulding with a rebate in various widths. Ash would be nice as it takes the knocks. If you mitred it on it's back, that is with the rebate facing up, it would form a neat little shelf to drop the board in. The typical rebate depth is about 7-8mm so if you could get 6mm MDF that would work nicely.
A Morso guillotine would be the favourite cutting gear, but you might be able to manage with a small electric mitre saw. The pro ones with all the bells and whistles are on a par costwise with Morsos, but there are DIY versions that are <£100. One of these may do the job, but as with anything else, you get what you pay for.
Joining hard woods with an underpinner is not easy, so you may as well nail the corners. A Stanley mitre vice would be good. Or a strap clamp is maybe better, if there is enough room to drill/nail the corners while it is on. Fill the nail holes and paint the whole thing black. Paint the back of the board as well, for neatness and to seal the board from humidity.
You shuld be able to do a dozen frames a week using these methods.
Sorry for crap drawing.
*A local timber merchant may be able to machine just the profile you need.
Watch Out. There's A Humphrey About
-
Bill Henry

- Posts: 935
- Joined: Wed 28 Mar, 2007 8:38 pm
- Location: Litchfield, NH USA
- Organisation: Not so much - it's kind of messy.
- Interests: Dry mounting dog hair, counting age spots on old people, playing chess with wood elves, scheming to take over the world.
- Location: Litchfield, NH USA
- Contact:
Years ago, some “artist” friends of mine in order to avoid supporting their local framer (me), created and assembled what they called “slat” frames. I think it was taught to them in the “Matchbook School of Art and Screen Door Repair”.
For the most part, they were trying to frame oils on stretched canvas, but this would work with MDF, I would guess.
They simply scrounged 1/2” by 3”, or so, strips of pine from the lumber yard, sanded them down a bit, and painted the top and interior surface black. They tended to stain the exterior surface if they weren’t too lazy.
They didn’t miter the moulding, but simply cut them with a circular saw at right angles and “butt ended” them so each one overlapped the adjacent rail.
At that point they simply nailed these slats to the edge of the canvas, either flush with the surface …

or recessed a bit …

If the guys weren’t stoned when they did it, the “frame” didn’t look too awfully bad; but most of the time they were, soooo …
These frames wouldn’t be anywhere as structurally strong as that suggested by Prospero, but it is a very inexpensive way to go about it since you wouldn’t need any equipment to speak of other than a saw and a hammer.
For the most part, they were trying to frame oils on stretched canvas, but this would work with MDF, I would guess.
They simply scrounged 1/2” by 3”, or so, strips of pine from the lumber yard, sanded them down a bit, and painted the top and interior surface black. They tended to stain the exterior surface if they weren’t too lazy.
They didn’t miter the moulding, but simply cut them with a circular saw at right angles and “butt ended” them so each one overlapped the adjacent rail.
At that point they simply nailed these slats to the edge of the canvas, either flush with the surface …
or recessed a bit …
If the guys weren’t stoned when they did it, the “frame” didn’t look too awfully bad; but most of the time they were, soooo …
These frames wouldn’t be anywhere as structurally strong as that suggested by Prospero, but it is a very inexpensive way to go about it since you wouldn’t need any equipment to speak of other than a saw and a hammer.
Don't take life so serious, son, it ain't nohow permanent! – Porky Pine
-
blockmount boy
- Posts: 12
- Joined: Tue 06 May, 2008 8:20 pm
- Location: Stockport


-
Merlin

- Posts: 1540
- Joined: Thu 05 Jun, 2003 5:50 pm
- Location: Cornwall
- Organisation: Merlin Mounts
- Interests: Aviation
Those are the Floater Frames that we use from LION.
We sell more in the natural wood range than we do in the stained range.
The band clamp, yes we have a couple of those and they do come in handy.
I think you will find that the Pushmaster will be very difficult to use on the Floater Frames because they are made from hard wood.
We sell more in the natural wood range than we do in the stained range.
The band clamp, yes we have a couple of those and they do come in handy.
I think you will find that the Pushmaster will be very difficult to use on the Floater Frames because they are made from hard wood.
John GCF

-
Roboframer
Re: Making floating frames - advice for newbie
I've got one - speculate to accumulate!blockmount boy wrote: If anyone has any other ideas I'd really appreciate it.
-
blockmount boy
- Posts: 12
- Joined: Tue 06 May, 2008 8:20 pm
- Location: Stockport
-
Not your average framer
- Posts: 11008
- Joined: Sat 25 Mar, 2006 8:40 pm
- Location: Devon, U.K.
- Organisation: The Dartmoor Gallery
- Interests: Lost causes, saving and restoring old things, learning something every day
- Location: Glorious Devon
I would suggest that it is less important to spend money on how you cut the moulding and much more important to get yourself a proper underpinner.
For what you are trying to do, you can get by with a Nobex Proman 110 mitre saw, (from Lion or Axminster power tools). Lion also have a cheaper mitre saw, which no doubt would be o.k. too.
I would suggest that you look for a suitablly priced underpinner. A new one would be nice if you have the budget for it, but there are often good secondhand ones, if you don't mind looking for one. Some really old basic ones can be very cheap indeed.
-
WelshFramer
- Posts: 996
- Joined: Wed 30 Nov, 2005 10:03 am
- Location: Llanwrtyd Wells
- Organisation: Neuadd Bwll Framing
- Interests: Does running a framing business leave any time for interests?
- Location: Llanwrtyd Wells
- Contact:
I use Lion's floater frames (again, the bare wood seems to sell the best but black is a close second).
I generally glue with a strap clamp and underpin when the glue is dry as I've had the mitre opening too many times when underpinning while the glue is wet.
Sometimes I don't bother to underpin. I use 5mm Fomecore as the backing for the poster or canvas and stick that into the frame all the way round with PVA>
I reckon that the whole frame being quite light and it being glued all round to the Fomecore it's hardly likely to fall to pieces.
If I do underpin it I use 7mm wedges - if the glue meets some sort of glue-eating microbe then at least the bits of the frame won't fall on the floor - but I hardly think it's necessary if it's properly glued with a decent wood glue.
-
The Crofter
- Posts: 367
- Joined: Wed 03 Oct, 2007 1:37 pm
- Location: Shrewsbury
- Organisation: Sutherland Arts & Crafts
- Interests: Photography
- Location: Shrewsbury
- Contact:
I have only made a few frames from deep rebate moulding but always glue, clamp and then fix right angle brackets to the four corners.
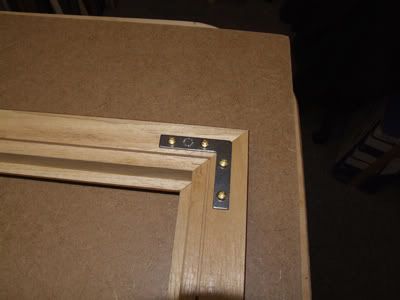
I was paranoid about my first frame and ended up drilling and recessed screwing at 45 degrees close to the top of the moulding. I used a plug cutter in a piece of scrap to make a matching plug, trimmed with a pull saw and sanded. Fixing was almost invisible. That particular frame will never fall to pieces - honest.
I was paranoid about my first frame and ended up drilling and recessed screwing at 45 degrees close to the top of the moulding. I used a plug cutter in a piece of scrap to make a matching plug, trimmed with a pull saw and sanded. Fixing was almost invisible. That particular frame will never fall to pieces - honest.
Pat
-
markw
Re: Making floating frames - advice for newbie
this thread reads like a do it yourself manual for the never framed anything before. Surely our advice should always be to go and get some training and then you wont have to answer very basic questions such as "what's a stacked wedge"