How do you do them?
Sorry I can't paint a thousand words with some pictures - but hopefully you can visualise.
Here's my default method.
Artcare foamboard former - shaped for shoulders, neck & sleeves (if sleeves not folded out of sight or on to front) by laying shirt as it is to be framed over the top of it and marking in pencil.
Insert former and pin in place on reverse. Using a curved needle, (so you go only through the back of the shirt and the former; not through the front of the shirt) - replace pins with individual stitches of button thread.
Place this central on the visible support (mountboard - suedette a lot of the time) and pin in place. This support is cut one inch larger than the glass (eg glass 30x40 - support 31x41") plus a piece of (strong enough)backing board ditto
Curved needle again - in through the mountboard at the back, through the former but not into the front of the shirt, back through the former and mountboard - tie off, 3 half hitches.
Individual stitches again - cut the cotton after each stitch - no need to carry on to the next.
First stitches are the 4 corners, then two each side at the edges - 12 stitches (for support) so far.
Then I'll look at the front and see where I can hide a stitch or two to prevent anything from flopping forward - motifs are good and so are seams - you can even go over existing visible stitches if you have the exact same colour thread - not a problem for me!
Failing that - or as well as that, now that you have support, you can add a few more strategic invisible stitches - i.e. still through the support and the former, but this time you pass the needle through the fibres of the shirt without coming through the front of it - a-la trouser hems. Very handy for the centre where flopping forward is most likely and the least likely place to find a seam or a motif.
You can do everything bar this invisible stitching with a tag gun - just not for me - yet!
I'll probably add a few more stitches around the neck to ensure you can't see the former. Probably about 20 support/semi support stitches per shirt including those basic 12.
Tape over the stitches at the back of the support with FP90, or something and then fix that support to the backing with PVA (applied with a roller) or a combination of PVA & ATG tape, the ATG tape just to save you weighting it.
That's the hard bit done.
Cut a mount (same colour as the support) and the glass one inch smaller than your support/backing.
Reverse bevel cut a 1" border from the mount and add a fillet (slip) - this hides the points holding the glass in. (fillet not necc - just a nice touch - but reverse bevel anyway)
Cut frame to fit glass and mount (mat) - clean the glass - place mount with fillet (made flush) face down on top of glass - turn the lot over, place frame on top and turn over again with glass/mount in place - check for flumbs - pin mount/glass in place.
(Wish I'd took those photos now - jeeze - started so I'll finish!!!)
Now you have a framed mount! But it's all held in - you can turn it any way you like and remove flumbs as necc.
The frame will have a good 1" rebate BTW!!
Line the rebate (and add more support) - stick some mountboard, same colour as the support, (but not necc) to some 3mm foamboard - just offcut strips, cut to size of glass and then into strips the depth of your remaining rebate - make sure you use PVA as well as ATG - ATG alone will give in time. Stick in place. You will be able to see the base of these spacers inside the frame, so they must not be too small, if they are you will see a gap between them and the support. Ever so slightly too deep is OK. Cut them straight, not bevelled.
Line the back of the frame - within half an inch of the inside, with ATG plus a bead of PVA to seal, and staple the shirt/former/mount/backing package to it - just put one or two staples per side in first, check for flumbs before stapling fully.
Seal with tape - twice - add hangers through the mount/backing into the frame.
Use countersunk screws instead of staples if you don't have a pneumatic stapler and whether you use staples or screws, don't spare them.
Swear a lot if the flumb pervert is feeling particularly evil that day ..... BUT - you do, at least, have a flumb trap with this method.
Sports shirts

-
WelshFramer
- Posts: 996
- Joined: Wed 30 Nov, 2005 10:03 am
- Location: Llanwrtyd Wells
- Organisation: Neuadd Bwll Framing
- Interests: Does running a framing business leave any time for interests?
- Location: Llanwrtyd Wells
- Contact:
-
Merlin

- Posts: 1540
- Joined: Thu 05 Jun, 2003 5:50 pm
- Location: Cornwall
- Organisation: Merlin Mounts
- Interests: Aviation
Folded shirt. . BTW the logo is printed crooked, it is not the layout.
Arqadia 202. (something), then white inner frame with a rebate of in this case 20mm.
Shirt is fitted to 3mm shaped foamboard (5mm is used on larger shirts) using Attach-EZE. The whole lot is then fixed to the mountboard again using longer attach -exe T's.
Mountboard is PVA'd to Art-Bak Aqua.
£130 for half shirt. Usually around the £170 starting point for full shirt.
John GCF
-
Not your average framer
- Posts: 11008
- Joined: Sat 25 Mar, 2006 8:40 pm
- Location: Devon, U.K.
- Organisation: The Dartmoor Gallery
- Interests: Lost causes, saving and restoring old things, learning something every day
- Location: Glorious Devon
Re: Sports shirts
Why didn't I think of that? If I had known that about three years ago, I might by now even enjoy doing them, which to date I don't!Roboframer wrote:Using a curved needle
I often try to price them so the customer will go elsewhere, but usually they don't and I still get the job.
-
osgood
Everyone has their own opinions on how a shirt should look. The main issue that is important is the materials and methods used to mount them.
I prefer my shirts to not look absolutely perfect as if they are just a graphic. I want them to look like a shirt, so these days I don't mind a few crinkles and creases.
The first one is a shirt I did a couple of weeks ago and the other two were done a few years ago.


I prefer my shirts to not look absolutely perfect as if they are just a graphic. I want them to look like a shirt, so these days I don't mind a few crinkles and creases.
The first one is a shirt I did a couple of weeks ago and the other two were done a few years ago.
-
Roboframer
Here is a small mount - no fillet, held in with a combination of fletcher rigid tabs from the manual gun and semi-rigid from the pneumatic gun - plus the strips of board to line the rebate. There is a throw on the bench to protect the frame.

Simons moulding - nice brushed finish but it scratches ever so easily.

Same method, less former - LJ Ferrosa moulding - flag etiquette out the window - this is exactly how customer wanted it and was even happy for me to trim it to this size, which I said I would not/had no need to do.

Simons moulding - nice brushed finish but it scratches ever so easily.
Same method, less former - LJ Ferrosa moulding - flag etiquette out the window - this is exactly how customer wanted it and was even happy for me to trim it to this size, which I said I would not/had no need to do.
-
Bagel Framer
- Posts: 242
- Joined: Fri 08 Jun, 2007 9:22 am
- Location: Aldershot, Hampshire
- Contact:
1) Hi - unless I'm missing something, I'm curious as to how one gets a needles through a mountboard:
"Curved needle again - in through the mountboard at the back, through the former but not into the front of the shirt, back through the former and mountboard - tie off, 3 half hitches."
I tried getting a needle through the mountboard for the two Chelsea Shirts that I framed last month. I couldn't get it to go through and was petrified of damaging the signed shirts. I then elected to make a variation on Lion's Shirt Hanger and hung the shirt naturally.
As the shirt was signed on the back, I was able to T tag gun the foamboard hanger to the mountboard. I then taped the ends of the tags with conservation tape.
2) In my experience, it was impossible to get the shirt on the cut-out (ie. laying the shirt on a sheet of foamboard, marking 40mm around the shirt in it's entirety then cutting it out. I probably would have fitted, but would quite possibly have ripped the shirt and if not, have looked like a shirt worn by someone like Pavarotti...!
The client loved the shirts, so I'll probably opt for the hanger option in the future for other jobs. I charged them £240.00 for both shirts, alas probably at a loss but I know for next time.
Thanks.
-
Roboframer
I just made quite a long winded reply - went to photobucket for a photo and lost all I typed - bah.
Anyway - curved needles - several types - 1. tapestry - bal point (blunt) designed to go through holes on canvas/aida etc - maybe this is what you have. 'Repair' is what you want. I admit it's a bit of a pain! A tag gun can go through everything but the front of the shirt if you want it to.
Formers - you don't want a tight fitting thing - measure the height and width of the shirt, cut a rectangle, place shirt over and trace shoulders and neck cut out. If sleeves are to be shown, or part shown, separate formers can be used. If a tight fit is required you can take up excess at the back - a neat fold each side, stitched in place and to the former at the same time.
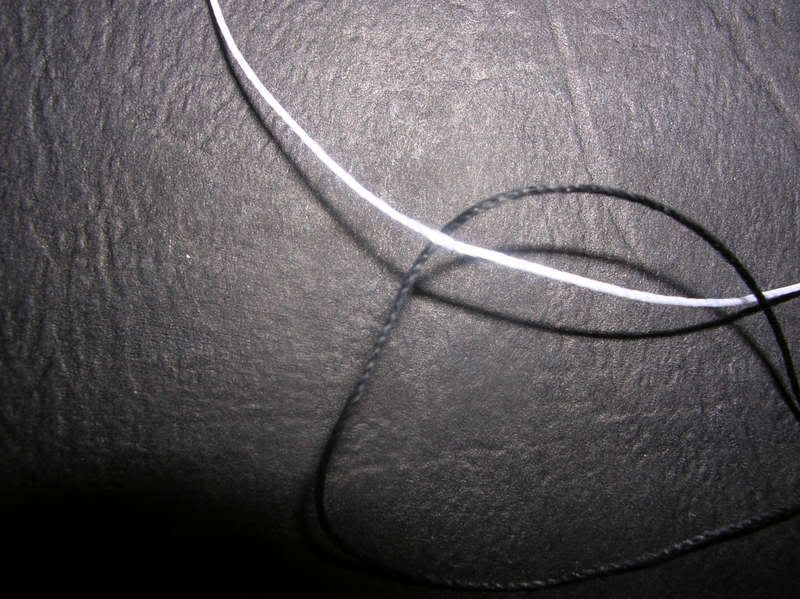
Invisible stitches - something a tag gun cannot do - you can bung one anywhere - here's a photo
Good innit
Ha!
Seriously - if you need a strategic stitch that is in the open you can go through the fibres without coming through the front - just like a hem is stitched.
The black thread below goes THROUGH the white one.
Anyway - curved needles - several types - 1. tapestry - bal point (blunt) designed to go through holes on canvas/aida etc - maybe this is what you have. 'Repair' is what you want. I admit it's a bit of a pain! A tag gun can go through everything but the front of the shirt if you want it to.
Formers - you don't want a tight fitting thing - measure the height and width of the shirt, cut a rectangle, place shirt over and trace shoulders and neck cut out. If sleeves are to be shown, or part shown, separate formers can be used. If a tight fit is required you can take up excess at the back - a neat fold each side, stitched in place and to the former at the same time.
Invisible stitches - something a tag gun cannot do - you can bung one anywhere - here's a photo
Good innit
Ha!
Seriously - if you need a strategic stitch that is in the open you can go through the fibres without coming through the front - just like a hem is stitched.
The black thread below goes THROUGH the white one.
-
Roboframer
-
Ian Goodman
- Posts: 40
- Joined: Sat 22 May, 2004 1:07 pm
- Location: Ashtonfield NSW Australia
- Organisation: Ian Goodman Photography
- Interests: Chinese Cooking.
Playing with my Grandchildren
Photoshop Training with Maitland U3A - Location: Ashtonfield - Australia
Sports Shirts
My default method now for framing Sports Shirts is:
3mm Foam core inside shirt cut a little bigger to allow some stretching.
Attach the shirt to the foam core with Qullters Cotton needle and some grannies knots.
Inside the sleeves I put some more 3mm FC cut precisely with the aid of tracing paper inside the sleeves and attach these to the foam core inside the shirt.
I use a cmc to cut the matt that will go undeneath the shirt with a vgroove on the top side of the matt and then cut out the corners so that I can turn up the sides of the matt usually 40mm.
To the back of that matt is attached 3mm foam core which stiffens up the matt holding the shirt.
With this matt done then I can attach the shirt to this again with Quilters cotton and needle.
Because it is difficult to purchase shadow box moulding I can make my own version of shadow box moulding.
I use 40mm x19mm hardwood and cut and join and then glue to the back of the prepared moulding, clamp this timber for 3 hours and then remove the clamps, this way you can use any moulding you like for these shirts.
Then a dust cover is applied which is 90gsm brown paper wet and allowed to dry and bingo you have a framed football or any type of sports shirt.
too easy.
Ian Goodman
http://www.iangoodmanphotography.com.au
http://www.iangoodmanphotography.com.au
-
Framer Dave
- Posts: 128
- Joined: Fri 30 Mar, 2007 9:03 pm
- Location: Houston TX
Ormond: Bless you for not going along with the whole "perfect shirt" school of thought. I mean, it is what it is: a textile that was never meant to be, and never will be, perfectly flat and square. If you want that, you may as well frame a dry mounted picture of the shirt.
Robo: Seeing the flag like that makes me feel ill and a bit sad. I know you're just going with what the customer insists on, but still...
Robo: Seeing the flag like that makes me feel ill and a bit sad. I know you're just going with what the customer insists on, but still...
-
osgood
Re: Sports Shirts
Ian,Ian Goodman wrote: Because it is difficult to purchase shadow box moulding I can make my own version of shadow box moulding.
Have you tried Megawood's 951BR, 951MAH, 951BLK?
I find these are ideal for shirts and other bulky items and the quality is very good too!
-
Roboframer
Sorry about that Dave - I saved it really - it's all still there. Had I refused - and I doubt if many Brit framers - or maybe some American ones, would actually do that - he'd have taken it somewhere that actually would have cut it to that reveal, or done it himself.Framer Dave wrote:
Robo: Seeing the flag like that makes me feel ill and a bit sad. I know you're just going with what the customer insists on, but still...
I reckon half our population don't know that the Union Jack has a right and a wrong way up, and out of those who do, I doubt that half of those would know which is the right way up.
-
Merlin
- Posts: 1540
- Joined: Thu 05 Jun, 2003 5:50 pm
- Location: Cornwall
- Organisation: Merlin Mounts
- Interests: Aviation
John (Robo)
You are SO right in that comment about the Union Flag having a right and a wrong way.
In my past life, Onboard a war canoe, I actually hoisted the Union Flag (Union Jack) at the ceremony of 'colours'.
Oh Boy, did that cost me a lot of money in the way of a 'fine' and stoppage of leave (shore leave that is) for the following month.
Fort Lauderdale USA. I never did that again.
Yet still I see the flag being flown the wrong way up. Even at Military events.
John GCF
-
Merlin
- Posts: 1540
- Joined: Thu 05 Jun, 2003 5:50 pm
- Location: Cornwall
- Organisation: Merlin Mounts
- Interests: Aviation
-
Framer Dave
- Posts: 128
- Joined: Fri 30 Mar, 2007 9:03 pm
- Location: Houston TX
Well how about that. Until I clicked on the link I would have never thought it possible to fly the Union Flag upside down. I guess I had never really looked at it closely enough to realize that it wasn't perfectly symmetrical.
I also noticed that it is flown upside down only to indicate dire distress. Doesn't seem very effective, as you'd have to look at it pretty closely to tell, something that would be difficult in the heat of battle.
I also noticed that it is flown upside down only to indicate dire distress. Doesn't seem very effective, as you'd have to look at it pretty closely to tell, something that would be difficult in the heat of battle.
-
Ian Goodman
- Posts: 40
- Joined: Sat 22 May, 2004 1:07 pm
- Location: Ashtonfield NSW Australia
- Organisation: Ian Goodman Photography
- Interests: Chinese Cooking.
Playing with my Grandchildren
Photoshop Training with Maitland U3A - Location: Ashtonfield - Australia
Spots Shirts
Hi Ormond
Have you tried Megawood's 951BR, 951MAH, 951BLK?
I have not tried these mouldings yet because my clients know that you are not restricted to 3 or 4 mouldings for a sports shirt.
By using a moulding extension you can use any moulding you can think of thus utilising the stock you have instead of ordering special stock for a particular order.
This method also enables me to either paint or stain the mouding extension whatever is required.
It also allows me to use mouldings that used to be shadow box mouldings but were discontinued by some moulding companies.
Can I also add that some framers are very resourceful at using alternative methods to achieve the desired result.
Any way thank you for the information on the mouldings taht you use.
Ian Goodman
http://www.iangoodmanphotography.com.au
http://www.iangoodmanphotography.com.au
-
WelshFramer
- Posts: 996
- Joined: Wed 30 Nov, 2005 10:03 am
- Location: Llanwrtyd Wells
- Organisation: Neuadd Bwll Framing
- Interests: Does running a framing business leave any time for interests?
- Location: Llanwrtyd Wells
- Contact:
Re: Spots Shirts
What's that, then?Ian Goodman wrote:Hi Ormond
Have you tried Megawood's 951BR, 951MAH, 951BLK?
-
John

- Site Admin
- Posts: 1893
- Joined: Sun 27 Apr, 2003 8:00 pm
- Location: Ireland
- Organisation: Tech Support
- Interests: Forums and stuff
- Location: Belfast
- Contact:
 951BR
951BR 951MAH
 951BLK
-
WelshFramer
- Posts: 996
- Joined: Wed 30 Nov, 2005 10:03 am
- Location: Llanwrtyd Wells
- Organisation: Neuadd Bwll Framing
- Interests: Does running a framing business leave any time for interests?
- Location: Llanwrtyd Wells
- Contact: