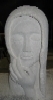
Then along came 2 of these - slightly half-egg shaped enameled copper objects.
Customer doesn't want then framed, but wants them individually mounted like plaques. I have no problem sourcing the wood plaques, staining and polishing etc, but how on earth do I mount them to a piece of wood.
They have previously been mounted by using pieces of cork which glued to the underside of the object on one side and onto a piece of mountboard on the other but over the years the weight has pulled them off as the glue dried out. I can't use a film over them as there's no glass going over them and they're going straight onto wood.
Help!!
P
And How do I Mount This?
-
Perfection
- Posts: 106
- Joined: Wed 17 Mar, 2010 1:57 pm
- Location: Huddersfield, UK
- Organisation: Framed To Perfection
- Interests: Photography, Fell walking
And How do I Mount This?
You do not have the required permissions to view the files attached to this post.

-
Roboframer
Re: And How do I Mount This?
I suppose there are 2 choices - stick 'em or hold 'em.
Are they flat on the back? If not and it's sticking them, then you'll also need to stick something inside the thing to make it flat.
If it's holding them then whatever holds them will be visible, but if that's OK then formed rods could be a go-er.
It's not an easy method to describe but you will need
1. Steel rods - like piano wire.
2. Shrink tubing
3. Corrugated plastic sheeting
Cut an oval out of the corrugated plastic sheet just smaller than the object - with the corrugations running vertically.
Cut two pieces of steel wire to size and form the ends into 'J' s so that the bowl of the 'J' goes over the edge of the object to hold it.
Slide a piece of shrink tubing over the bowl of the 'J' and heat it with a heat gun - or something! Paint it to match the object.
Remove the covering from two of the channels in the corrugated sheet - probably about 25mm each side of the centre and place your rods in them. They will already be bent to shape - to hold the object - something like this ......
) (
Place them in those channels and fix them with something that dries rock hard - like poxy resin or araldite.
Stick the currugated sheet, complete with the ') (' of fitted rods to your plaque and then fit the object.
Hope that all makes some sense - it's a method I'd use if I was framing these, but the difference would be that the rods would pass through mountboard and the Corrugated plastic sheet would be behind that and the same size as the mount and backing board; sandwiched between them.
OR ..... get a plate hanger - one of those spring ones - they're covered in shrink tubing and can be painted.
But instead of a solid plaque have one with a hole cut in it, just smaller than the object so that the hanger can be sunk in to it and secured.
-
Perfection
- Posts: 106
- Joined: Wed 17 Mar, 2010 1:57 pm
- Location: Huddersfield, UK
- Organisation: Framed To Perfection
- Interests: Photography, Fell walking
Re: And How do I Mount This?
Thanks Robo
Plenty of food for thought ..
I like the idea of the J-hooks and that's what I'll probably go with.
Won't get the finished wood till Friday, then it needs treating so it will be early next week when I try to put it all together, will let you know how it goes.
The only other thought I've had is that these things are metal (copper) so I might try to weld something to the inside like steel wire which I can pass through the wood and secure at the back.
P
-
mikeysaling

- Posts: 1557
- Joined: Mon 08 Mar, 2010 3:53 pm
- Location: braintree essex
- Organisation: sarah jane framing
- Interests: astronomy medals photography
- Contact:
Re: And How do I Mount This?
what size is this object ?
when all is said and done - there is more said than done.
-
Colin
- Posts: 19
- Joined: Thu 19 Mar, 2009 1:40 pm
- Location: Teynham, Kent
- Organisation: Polka Dot Art Centre
- Interests: Sculpture and art in general
- Contact:
Re: And How do I Mount This?
Hmmmm, tricky. Firstly I wouldn't apply any heat to the back by welding, brazing or soldering. The base is copper which will expand more than the enamel (glass) decoration when heated. You could end up with a disaster on your hands.
I think gluing is the only answer using epoxy resin or silicone. Many years ago stationery shops used to sell things like a brass disk with two tails of brass strip attached to the back. Don't know what they were called but they were used to hold large wads of paper together. I would look for something like that. Glue the disk to the back of the object with a large dollop of glue. Drill a hole through your wood board, pass that tails through, fold them down flat and glue them with a patch of fabric over.
Hope this helps
Colin
Sic dunkum biscuitus disintegrat
-
Merlin

- Posts: 1540
- Joined: Thu 05 Jun, 2003 5:50 pm
- Location: Cornwall
- Organisation: Merlin Mounts
- Interests: Aviation
Re: And How do I Mount This?
As Robo said.
Sometime in 2003, I was framing some fossils and asked for advice both on here and on TFG
Here is the link for using Formed Rods.
http://thegrumble.com/showthread.php?t= ... ng+fossils
It really worked.
Sometime in 2003, I was framing some fossils and asked for advice both on here and on TFG
Here is the link for using Formed Rods.
http://thegrumble.com/showthread.php?t= ... ng+fossils
It really worked.
John GCF
-
mikeysaling
- Posts: 1557
- Joined: Mon 08 Mar, 2010 3:53 pm
- Location: braintree essex
- Organisation: sarah jane framing
- Interests: astronomy medals photography
- Contact:
Re: And How do I Mount This?
was waiting for size info but how about two mighty mounts below one above and double sided velcro behind stuck with bostic clear or even epoxy resin. however not sure of object size.
when all is said and done - there is more said than done.
-
Roboframer
Re: And How do I Mount This?
Reckon those post-it notes are 4x4" ?
If you use adhesive, of any sort, on anything, you have 'done something' to it - if you simply hold it in place then you've done nothing to it.
If it's to be stuck then all the customer needs is the plaque - anyone can slap adhesive about.
If you use adhesive, of any sort, on anything, you have 'done something' to it - if you simply hold it in place then you've done nothing to it.
If it's to be stuck then all the customer needs is the plaque - anyone can slap adhesive about.
-
Perfection
- Posts: 106
- Joined: Wed 17 Mar, 2010 1:57 pm
- Location: Huddersfield, UK
- Organisation: Framed To Perfection
- Interests: Photography, Fell walking
Re: And How do I Mount This?
Sorry Guys,
ONly just got home - been a bit of a busy one.
The objects in question are only about 8" x 4" (small post-its!)
P
Thanks for the advice on not welding/soldering - not going to go there.
ONly just got home - been a bit of a busy one.
The objects in question are only about 8" x 4" (small post-its!)
P
Thanks for the advice on not welding/soldering - not going to go there.
-
mikeysaling
- Posts: 1557
- Joined: Mon 08 Mar, 2010 3:53 pm
- Location: braintree essex
- Organisation: sarah jane framing
- Interests: astronomy medals photography
- Contact:
Re: And How do I Mount This?
if they dont weigh too much i would certainly ask customer about glueing (seems like its been done before) and the MM's are a safety net!
when all is said and done - there is more said than done.
-
Perfection
- Posts: 106
- Joined: Wed 17 Mar, 2010 1:57 pm
- Location: Huddersfield, UK
- Organisation: Framed To Perfection
- Interests: Photography, Fell walking
Re: And How do I Mount This?
Spoken to customer - he's absolutely fine with whatever we decide - gluing included, SO I guess we'll take a look at gluing. Looking forward to getting the wood tomorrow, two slabs of mahogany each about 14x10 with a cushioned edge.
-
Fat Jedi
- Posts: 30
- Joined: Fri 17 Aug, 2007 10:36 pm
- Location: Worcestershire
- Organisation: Working from Home
- Interests: Art, Framing, all manner of Sci-fi geekiness!
- Location: Worcestershire
Re: And How do I Mount This?
For my two pennies worth, I would consider attaching earth magnets to the back of the copper (unfortunately copper isn't magnetic unless it has been mixed with other magnetic metals).
Then sink the opposite magnet or a piece of magnetic metal into the wooden plaque and simply attach.
Less destructive than glue and earth magnets are very, very strong. Not your usual fridge magnet
FJ
Then sink the opposite magnet or a piece of magnetic metal into the wooden plaque and simply attach.
Less destructive than glue and earth magnets are very, very strong. Not your usual fridge magnet
FJ
Somedays I'm the pigeon, but mostly I'm the ruddy statue!!
-
Roboframer
Re: And How do I Mount This?
How would you fix the magnet to the copper?Fat Jedi wrote:... I would consider attaching earth magnets to the back of the copper (unfortunately copper isn't magnetic unless it has been mixed with other magnetic metals).
Less destructive than glue
-
mikeysaling
- Posts: 1557
- Joined: Mon 08 Mar, 2010 3:53 pm
- Location: braintree essex
- Organisation: sarah jane framing
- Interests: astronomy medals photography
- Contact:
Re: And How do I Mount This?
i refer the honourable gentlemen to the reply i gave a couple of posts backmikeysaling wrote:was waiting for size info but how about two mighty mounts below one above and double sided velcro behind stuck with bostic clear or even epoxy resin. however not sure of object size.
when all is said and done - there is more said than done.
-
Roboframer
Re: And How do I Mount This?
How is the plaque going to be hung on the wall?
Contact adhesive might be good, but you might want to back it up with some 'D' rings and wire or something
Contact adhesive might be good, but you might want to back it up with some 'D' rings and wire or something
-
Fat Jedi
- Posts: 30
- Joined: Fri 17 Aug, 2007 10:36 pm
- Location: Worcestershire
- Organisation: Working from Home
- Interests: Art, Framing, all manner of Sci-fi geekiness!
- Location: Worcestershire
Re: And How do I Mount This?
I would use have to use glue.Roboframer wrote: How would you fix the magnet to the copper?
To clarify - I would not use adhesive to attach the copper to the actual wooden plaque and would feel more in control of the glue's coverage this way, i.e. the glue is on the reverse of the magnets. The less destructive part comes from the fact that the art could be removed in a more controlled fashion if ever it needed to be than prising it off a wooden plaque and having wood come with it - thereofre preserving the piece of art for the future.
FJ
Somedays I'm the pigeon, but mostly I'm the ruddy statue!!
-
Not your average framer
- Posts: 11008
- Joined: Sat 25 Mar, 2006 8:40 pm
- Location: Devon, U.K.
- Organisation: The Dartmoor Gallery
- Interests: Lost causes, saving and restoring old things, learning something every day
- Location: Glorious Devon
Re: And How do I Mount This?
Warning: Most types of RTV* silicon compounds release acetic acid during the curing process and acetic acid will corrode copper or copper based alloys.
* Before someone asks RTV stands for "Room temperature vulcanising"
If you are applying a finish to the wood, consider any compatiblity issues regarding the applied finish and any adhesive method you intend to use.
Just a thought, have you checked out those self adhesive double sided sticky pads sold by car accessory shops for sticking rear veiw mirrors to car windscreens. They have fantastic long term adhesion and strength of bond, if you can provide the correct mating surface finish to the wood.
Most (perhaps all), cellulose based wood finishes will bond very permanently with the cellulose fibres in the wood and subject to the correct material properties may provide a long term "stable" mounting surface for the self adhesive double sided pads.
I'm thinking about "nitrous cellolose" or "melamine lacquer" which generally should both contain a cellulose type thinners. Off the top of my head, I don't know if either of these will need sealing after application. If so, this may be a problem, if the surface needs sealing with a coat of wax. (Wax and self adhesives are not generally a good combination).
Mark Lacey
“Life is short. Art long. Opportunity is fleeting. Experience treacherous. Judgement difficult.”
― Geoffrey Chaucer
“Life is short. Art long. Opportunity is fleeting. Experience treacherous. Judgement difficult.”
― Geoffrey Chaucer
-
Roboframer
Re: And How do I Mount This?
Fat Jedi wrote: I would consider attaching earth magnets to the back of the copper (unfortunately copper isn't magnetic unless it has been mixed with other magnetic metals).
Less destructive than glue
Roboframer wrote:How would you fix the magnet to the copper?
Therefore the object is fixed with glue; not magnets.Fat Jedi wrote:I would use have to use glue.
.....the glue is on the reverse of the magnets.
-
mikeysaling
- Posts: 1557
- Joined: Mon 08 Mar, 2010 3:53 pm
- Location: braintree essex
- Organisation: sarah jane framing
- Interests: astronomy medals photography
- Contact:
Re: And How do I Mount This?
when all is said and done - there is more said than done.
-
Fat Jedi
- Posts: 30
- Joined: Fri 17 Aug, 2007 10:36 pm
- Location: Worcestershire
- Organisation: Working from Home
- Interests: Art, Framing, all manner of Sci-fi geekiness!
- Location: Worcestershire
Re: And How do I Mount This?
Nearly - The object is attached with magnets - the magnets are attached with glueRoboframer wrote: Therefore the object is fixed with glue; not magnets.
FJ
Somedays I'm the pigeon, but mostly I'm the ruddy statue!!